Friday, August 31, 2012
Saturday, August 18, 2012
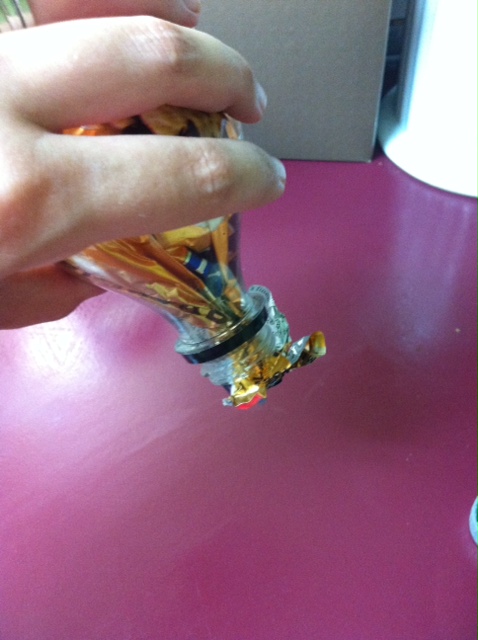
Pin 20: Triple Chocolate Oreo Truffles
Time: 40 minutes
Cost: $5.50 for around 30 truffles
Result: Good?
Originally Pinned from: http://pinterest.com/pin/251638697899685928/
2 Pins in a row where I didn't read the original post? Yup. You'd think I'd learn my lesson. Nope. Sorry, I can be a bit dense!
Seeing the title: Triple Chocolate Oreo Truffles, my assumption was that the recipe was based on the Oreo Truffle Recipe I used this past Christmas (Mix crushed Oreos with a block of cream cheese, roll into balls, then dip in chocolate flavored almond bark for a pretty presentation)
A Lightbulb went off in my head thinking...ooh! The original recipe must use the new CHOCOLATE CREAM CHEESE! Which is just scrumptious in case you're wondering...(Seriously, stop wondering and go get some!)
So I mixed around 15 oz (give or take a few cookies...) with a container of the Philadelphia Indulgence Dark Chocolate. Then refrigerated for a while before rolling into balls and dipping in almond bark. Since I burned the first batch of almond bark in the microwave (no more teasing hubby about burning chocolate chips 8 years ago *sigh*), I was grateful to have just enough to finish coating my truffles.
I didn't really care for the flavor of these. I can't explain what I didn't like, it just didn't taste right. They seemed to be very popular at small-group though! Maybe the reason I didn't like them had something to do with me burning the taste-buds off my tongue a few hours earlier? It may just be possible that Curly's clutziness was an inherited trait.
Friday, August 17, 2012
Pin 19: Mail-a-Hug
Time: 10 minutes
Cost: $0
Result: Okay
Originally Pinned from:rootsandwingsco.blogspot.com
I loved the idea of the kids sending their Mimi a hug in the mail. Unfortunately this was NOT one of the occasions where I read the post before attempting it. Oops.
I found a LONG scrap of butcher paper from a previous Amazon shipment. I'd saved it hating to throw out such a long piece of paper. I'd recommend trying to find a lighter color paper.
Then I let the big kids pick out their own color crayon and traced their upper body on the page. Curly and Specs orange and green colors don't show up well at allr! I picked purple for Tiny and it shows up very well, but I didn't want to go back on the kids' chosen colors. (for the big kids I traced their fingers, but I was struggling to keep Tiny from rolling over the whole time so I just traced her fists)
The original post has the kids coloring their faces and clothes on the hug, and the mother cutting it out. Since my kids are too young to spend that much time (much less accuracy) coloring, I didn't have them color it in and just wrote a message. Mimi will be getting a hug from all three kids at once in this case!
Cost: $0
Result: Okay
 |
| If you look very closely, you can see a vague green outline of Spec's hand in the top right corner. |
Originally Pinned from:rootsandwingsco.blogspot.com
I loved the idea of the kids sending their Mimi a hug in the mail. Unfortunately this was NOT one of the occasions where I read the post before attempting it. Oops.
I found a LONG scrap of butcher paper from a previous Amazon shipment. I'd saved it hating to throw out such a long piece of paper. I'd recommend trying to find a lighter color paper.
Then I let the big kids pick out their own color crayon and traced their upper body on the page. Curly and Specs orange and green colors don't show up well at allr! I picked purple for Tiny and it shows up very well, but I didn't want to go back on the kids' chosen colors. (for the big kids I traced their fingers, but I was struggling to keep Tiny from rolling over the whole time so I just traced her fists)
The original post has the kids coloring their faces and clothes on the hug, and the mother cutting it out. Since my kids are too young to spend that much time (much less accuracy) coloring, I didn't have them color it in and just wrote a message. Mimi will be getting a hug from all three kids at once in this case!
Thursday, August 16, 2012
Pin 18: Subway art birth stats
Time: 1 hour
Cost: $0
Results: Good

Originally Pinned from: www.etsy.com
I've wanted something like the link above for a long time. But 3 kids time $20...ouch. That's a heck of a Christmas present! I felt like surely I should be able to make something similar, but hadn't seen any tips or had any ideas (other than painstakingly printing all the stats in varying sizes, fonts, oh and in reverse and then attempting to trace them onto a board.
Then yesterday, I stumbled across a tip on one of my new favorite blogs, that it could be done in Picasa. Really?! As in free Picasa?! So I started the hunt for a tutorial. Found!
Once I got started it STILL took about an hour to input all the data and choose colors, fonts, etc and get familiar with the software. I can see why folks charge $20 per print! I added a few options to my own etsy store (although after noticing a spelling error on Pittsburgh, I offered potential customers up to two 'proofs' so that they can edit for themselves as well.)
Overall this was a fun project (if painstaking) AND it saved me $60. I'd call that a score!
Wednesday, August 15, 2012
Pin 17: Sharpie on Porcelain
Time: 5-30 minutes + 30 minute bake
Cost: $6
Results: FUN and Good

 Originally Pinned from: thephobia.com
Tip 1: The 'pin' itself said to color with a Sharpie and then bake @ 350 for 30 minutes. The link is from someone who purchased it on Etsy, so there are no instructions.
Tip 2: The attached comments state that Sharpie will still rub off after baking, and that a porcelain pen is needed for the project
Tip 3: Before baking, the Sharpie (unknown results w/ porcelain pen) will wipe off with just a bit of rubbing with a baby wipe.
Now I'm making these as teacher gift / pen holders, so I'm not super worried about dish-washing or even much hand-washing...though I will need to attach a note regarding recommended care. I may look into getting a porcelain pen in the future, because this is addictive!
Cost: $6
Results: FUN and Good


Tip 1: The 'pin' itself said to color with a Sharpie and then bake @ 350 for 30 minutes. The link is from someone who purchased it on Etsy, so there are no instructions.
Tip 2: The attached comments state that Sharpie will still rub off after baking, and that a porcelain pen is needed for the project
Tip 3: Before baking, the Sharpie (unknown results w/ porcelain pen) will wipe off with just a bit of rubbing with a baby wipe.
Now I'm making these as teacher gift / pen holders, so I'm not super worried about dish-washing or even much hand-washing...though I will need to attach a note regarding recommended care. I may look into getting a porcelain pen in the future, because this is addictive!
Tuesday, August 14, 2012
Pin 16: Hard-baked Eggs
Time: 30 minutes
Cost: 1 or 2 dozen eggs
Result: Excellent! (or Eggcelent as the case may be *snicker*)

Originally Pinned from: 247moms.com
I've been using this Pinterest gem for a couple months now. It's eggspecially (ok,ok I'll stop!) useful since WH is on a low-carb diet and eats a TON of deviled eggs. Baked eggs peel SO easily with no extra tricks. Simply bake at 350 for 30 minutes, cool, and peel.
The original pin displays a muffin tin, but since I like to cook 2 dozen at once, the mini muffin pan is perfect.
Strangely most eggs will come out with these funny brown dots all over them. At first I thought my oven was so nasty it was splattering something all over the eggs. Now I suspect it's exploded egg residue from the plant or something, as every once in a while an entire dozen will cook up without a single spot. I've even cooked 2 dozen side-by-side and the ones from one carton had brown spots and the others were completely white. Once peeled the spots are gone and don't affect the finished product.
See the egg on the top row that had it's shell explode? I've done this trick countless times and have never seen that happen! Too strange!
Monday, August 13, 2012
Pin 15: Sweeping Square Game
Time: 5 seconds
Cost: $0
Result: Fun!

Originally Pinned from: picasaweb.google.com
Anyone with kids knows the feeling of sweeping up enough cheerios to feed a small country. (at least I hope it's not just me!) I'm trying to teach the kids to clean up their own messes, and loved the idea of turning this one into a game!
I was not optimistic about the kids enjoying this 'game' despite the fact that they love to play with the broom & swiffer. I was half right. Curly enjoyed playing with the broom, but didn't remotely understand the goal. Specs surprised me by having a good time, and enjoying the challenge. He experimented with different broom and swiffer techniques before settling on one with a broom. Then he challenged himself to 'one last cheerio' swept up.
In the picture, you can see I placed the tape by the back door. This is where our portable dishwasher resides when not in use. The idea being I can leave the tape there, and it can be a dishwasher day game. I may end up adding a circle as well, since Specs wanted to sweep the square cereal into the square and was asking for a circle to sweep the cheerios into. I love the idea of making it a shape sorting game too!
Sunday, August 12, 2012
Pin 14: Healthy breakfast cookie/bars
Cost: Unsure, but CHEAP - plus I already had all the ingredients
Result: FAIL

Pros:
- Easy!
- Healthy!
- Ingredients most people already have
- Balanced with a bit of sweet and a lot of protein!
- Look fairly nice when served
- Not too crumbly
- The pictures on the original recipe blog are so pretty and quaint with the cute little spoons, that just making this recipe makes me feel like a pioneer home-maker (yes, that's a good thing)
Cons:
- Texture is not pleasant
- My kids won't eat them. In fact they'd rather not eat....and I think I agree with them on this one.
Saturday, August 11, 2012
Pin 13: Reusable Swiffer Sweeper Cover
Time: 30 minutes to make 2 covers
Cost: $.65 after tax - I used scraps, but it took 1/8 of a yard to make 2 covers @ 4.99 a yard
Result: Excellent!


I don't own a surger, so I simply zig-zag stitched around the edge. When my matching bobbin color ran out,I got really lazy and used a hot pink bobbin I had ready to better display the zig-zag.

Notice the 'puffy' pockets on the finished product. This is what lets the cover slip on and off to wash without ripping. I was worried it would make the cover too loose to actually clean with, but it worked very well!

Cost: $.65 after tax - I used scraps, but it took 1/8 of a yard to make 2 covers @ 4.99 a yard
Result: Excellent!
 |
| The crud left behind by the broom |
 | |
| Reusable cover's 1st use |
Originally Pinned from: dollarstorecrafts.com
There aren't any measurements listed, so I just winged it by tracing about a 1/2 inch around the swiffer base (seam allowance).

My first attempt I made the 'wings' for the top too wide and not 'deep' enough. For the second one I ended up making them fairly thin and longer than the base piece so that I could pleat them. The 'pleating' allows the cover to be removed without tearing the seam. (see my first attempt)

I don't own a surger, so I simply zig-zag stitched around the edge. When my matching bobbin color ran out,

Notice the 'puffy' pockets on the finished product. This is what lets the cover slip on and off to wash without ripping. I was worried it would make the cover too loose to actually clean with, but it worked very well!

Friday, August 10, 2012
Pin 12: DIY Household Cleaners Part 1
Time: under 35 minutes from getting out of my chair to everything cleaned up and labelled. Realistically each individual recipe took about 5 minutes
Cost: Not quite $4 in actual ingredient cost
Result: Excellent!

 Dishwashing Detergent: - $1.50 for about 40 loads
Originally pinned from: thecoffeyhouseblog.blogspot.com
1 cup Borax
1 cup washing soda (Same as PH-UP found in the pool section)
1/2 cup salt (Kosher recommended but I only had Sea Salt)
3 packets Koolaid Lemon mix unsweetened (for the citric acid)
Mix ingredients well and store in an airtight container. Use 1 Tbs per load. Optionally you can use vinegar as the 'rinse aid' in each load.

Tub Cleaner: - $.55 for a half bottle
Originally pinned from: www.food.com
Equal parts hot vinegar and original Dawn soap shaken in a spray bottle (I upcycled an old Windex bottle)

Toilet Cleaner: - $1.25 for about 5 uses
Originally pinned from:everythingishomemade.com
1 1/2 cups baking soda
1/2c lemon juice (this mixture will last about 6 weeks before spoiling. You can use water instead of lemon juice for a mix that won't go bad)
1/2c water
1 Tablespoon Tea Tree Oil Bonners liquid soap (or liquid soap and a few drops of tea tree oil)
Mix ingredients into a thin paste/batter. Pour into a squirt bottle. Before each use, shake to combine.

Glass Cleaner (Alvin Corn): - $.40 for a half bottle
Originally pinned from: www.crunchybetty.com
2 cups hot water
1 Tablespoon corn starch
1/4 cup rubbing alcohol (the only clear alcohol I had in the entire house was coconut rum...hey, it smells good!)
1/4 cup vinegar
Shake before use to dissolve corn starch.
Thursday, August 9, 2012
Pin 11: 1 Carb Chocolate Mousse
Time: 5 minutes
Cost: ~$2 for 5 small servings
Result: Yummy

Originally pinned from: chocolatecoveredkatie.com
Served in our one shot-glass, since the original name was Chocolate Frosting Shots. And really it's a perfect serving size. Again, despite the use of Stevia, this is not a very sweet dessert, but has a rich, almost bitter chocolate taste. If you enjoy your chocolates 80% cacao and above, you will enjoy this 'Mousse'. I hear a lot of people say they dislike coconut, but (while I myself love coconut) you can't taste it at all in this recipe.
My next project needs to be a light-box or something. Horrible lighting in the house and nowhere free enough of clutter to get a good backdrop.
Wednesday, August 8, 2012
Pin 10: Homemade Twix Bars
Time: 1 1/2 hours
Cost: $11
Result: Meh.

Originally pinned from: cookiesxo.blogspot.com
What. A. Pain!!!! Henceforth, these shall be known as Pain-In-The-Butt Bars.
First, there's finding the ingredients.
Then there's making the different parts.


The good things about this recipe:
Makes around 90 small bars
Looks pretty and impressive
It's a great way to show off my PC stoneware and mini serving spatula (I'm a Pampered Chef consultant, so bonus points to any recipe that lets me display my wares)
It tastes fairly authentic, although the shortbread was missing something
Went over VERY well at my event
The bad:
It's a PITA (Pain In The A**)
It's not much cheaper than buying the same amount of actual Twix
It takes an hour and a half....and I don't mean 5 minutes prep and the rest baking...oh no, there's a lot of mixing and spreading and stirring over a hot stove involved.
Cost: $11
Result: Meh.

Originally pinned from: cookiesxo.blogspot.com
What. A. Pain!!!! Henceforth, these shall be known as Pain-In-The-Butt Bars.
First, there's finding the ingredients.
- 20oz of caramels, which is a bag and a half. I'm never going to use that other half of a bag....so we'll just skimp a bit on the caramel.
- 18oz of Hershey's chocolate. Have you ever looked at the per $$$ price of that stuff? It tastes like dirt (I might be a tiny bit chocolate snobbish) and according to the sticker it costs over $7 a pound!?! I saw Belgian chocolate for cheaper! Fortunately I happened to see the fun-size Hershey's bars on sale for $4.45 a pound. All snobbery goes out the window when it comes to candy bars, so I went with the Hershey's in case that made this taste more 'authentically Twix'.
Then there's making the different parts.
- The shortbread wasn't difficult per-se, but you have to use room-temp butter (which I forgot to leave out for a few hours) and I had to pull out my big heavy mixer. Luckily I learned a trick with my microwave: Defrost setting 1 = perfectly softened (not melted) butter.
- My favorite part of this step was stabbing the dough with a fork...I may have gone overboard

- The caramel layer involves unwrapping 50+ individual caramels and then stirring them frequently while they melted at a low temp. The shortbread baked and was half-way to cool in the time it took to finish this process.

- Then while the caramel was hardening in the fridge, I had to unwrap all the fun-size Hershey bars. Fortunately chocolate melts a lot easier than caramel.

The good things about this recipe:
Makes around 90 small bars
Looks pretty and impressive
It's a great way to show off my PC stoneware and mini serving spatula (I'm a Pampered Chef consultant, so bonus points to any recipe that lets me display my wares)
It tastes fairly authentic, although the shortbread was missing something
Went over VERY well at my event
The bad:
It's a PITA (Pain In The A**)
It's not much cheaper than buying the same amount of actual Twix
It takes an hour and a half....and I don't mean 5 minutes prep and the rest baking...oh no, there's a lot of mixing and spreading and stirring over a hot stove involved.
Tuesday, August 7, 2012
Pin 9: Cleaning the dishwasher
Time: 5 minute prep
Cost: $0.50
Result:Good...I think? Excellent!
Originally pinned from: onegoodthingbyjillee
Dishwasher was starting to smell funky (who wants their clean dishes to smell like wet dog?...shudder) and get a little gunky. We've had it 4 years and never cleaned it, so..yeah. It was about time. (In case the 1st post didn't give it away, I'm not a very good housekeeper.)
1.) Clean out the trap at the bottom of the machine. Actually only found one little tiny piece of something.
2.) Fill the soap dispenser with unsweetened Lemonade mix. Apparently the citric acid is good for the machine or something?
3.) Fill a bowl with vinegar and place it upright in the top shelf.
4.) Run a cycle.
It smells faintly of vinegar now and no lingering bad odor. Unfortunately it does NOT smell like lemonade. That would have been cool. We'll see how the dishes smell next time we run it. I think the reason it gets funky is because we never have enough to fill it up every day, so why waste the water. But then the dirty dishes sit all close-up in it for 2-3 days and ...well..you get the idea. This was so cheap and easy that I plan to do it monthly. Okay, okay! At least a few times a year.
I considered a before and after picture, but since there's no such thing as smellavision, it's sort-of pointless.
Edit: After running a load of dirty dishes through, they came out smelling wonderful and fresh. No lingering odor. Love this trick!
Cost: $0.50
Result:
 |
Dishwasher was starting to smell funky (who wants their clean dishes to smell like wet dog?...shudder) and get a little gunky. We've had it 4 years and never cleaned it, so..yeah. It was about time. (In case the 1st post didn't give it away, I'm not a very good housekeeper.)
1.) Clean out the trap at the bottom of the machine. Actually only found one little tiny piece of something.
2.) Fill the soap dispenser with unsweetened Lemonade mix. Apparently the citric acid is good for the machine or something?
3.) Fill a bowl with vinegar and place it upright in the top shelf.
4.) Run a cycle.
It smells faintly of vinegar now and no lingering bad odor. Unfortunately it does NOT smell like lemonade. That would have been cool. We'll see how the dishes smell next time we run it. I think the reason it gets funky is because we never have enough to fill it up every day, so why waste the water. But then the dirty dishes sit all close-up in it for 2-3 days and ...well..you get the idea. This was so cheap and easy that I plan to do it monthly. Okay, okay! At least a few times a year.
I considered a before and after picture, but since there's no such thing as smellavision, it's sort-of pointless.
Edit: After running a load of dirty dishes through, they came out smelling wonderful and fresh. No lingering odor. Love this trick!
Monday, August 6, 2012
Pin 8: Bottle-top Bag-stopper
Time: 5 minutes
Cost: $0
Result: FAIL

I love the idea of repurposing things instead of tossing them out. Plus I love the idea of free ways to keep my food fresh. I wish I could afford all the containers it would take to have a totally organized pantry, but until that day (as I collect it piece at a time) this upcycled bag stopper seemed to be too good to be true. And sure enough it was.
It wasn't too hard to cut through the bottle top. First I scored it with the PC I-Slice, then I punched through with a knife. Then I attempted to thread the bag of chocolate chips I'd recently opened through the top. It was too full, so I emptied about half of the bag in an attempt to make the excess bag long enough to thread through the top. It worked this time, and I folded the sides of the bag over the top edge of the top. The cap screwed on and kept it nicely sealed. Wonderful! But wait...upon attempting to remove a few chocolate chips, I had to completely pull the bag out to shake some loose. *sigh* oh well, it was worth a shot. Back to a classic form of 'upcycling'.
 Edit: Now I see that the instructions say 'wide-mouthed' bottle. I bet this would have worked..perhaps Gatorade or something. I think I'll still stick with my mason jars for now, lol.
Sunday, August 5, 2012
Pin 7: Bacon awareness chicken
Time: 5 minutes prep - 40 minutes bake
Cost: About $2.25 per serving
Result: Delicious

Originally pinned from: blogchef.net
It was supposed to be bacon-wrapped chicken. But I didn't have any toothpicks and couldn't figure out how to get the bacon to stay, so I just draped it over the cream cheese. Upon eating it, I realized that the bacon unintentionally looked like the awareness ribbons, hah! Very yummy though.
Oh! And I only had plain cream-cheese, so I just mixed some of my favorite PC Rosemary Herb Mix into it, and it did the trick.
Saturday, August 4, 2012
Pin 6: Personlized Handwriting Workbook
Time: 25 minutes
Cost: $3 / binder & heavy duty page covers
Result: Excellent!!!

Pin source:customized hand-writing pages
When I first saw this link, I thought how fun it would be to make a book for Specs to practice reading, practice writing, AND learn things like his phone number and address. Due to his special delays, he also has to memorize phrases about himself, since he doesn't really understand questions like, 'what's your name?', and 'how old are you?'. So I included those important details too.
The workbook needed to be reusable so I wasn't constantly printing out pages (especially since that part was a little painful) So I slipped each page into a heavy-duty page protector, which I'd read were dry-erasable. Perfect for use with Specs' dry-erase crayons!
Frustration 1: character limits. 12 characters for portrait pages and 17 for landscape. I wanted the whole book to be uniform, so after much playing around with it, all the pages are in landscape.
Frustration 2: in landscape you end up with 2 printed pages, which I didn't want. So I learned to only print 'page 1 of 1'. I used scrap paper for the pages...if it ends up distracting him too much, I'll reprint on plain 'new' paper.
Possible Mistake 1: I purchased 'non-glare' page protectors, which have a bumpy texture...At first I didn't like it, but then I realized it helped Spec's crayons grip the page better....thank goodness because he's a perfectionist and has a mini-melt-down anytime his crayon slips.


Specs is obsessed with numbers, so I shouldn't have been surprised that our phone number was his favorite page. Wonderful! Not to mention this was the longest he's sat still all summer. Definitely a winning project!
Friday, August 3, 2012
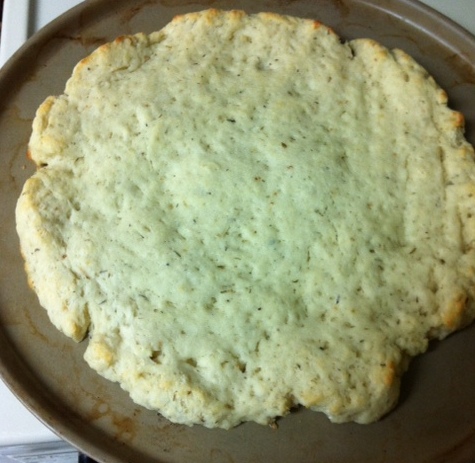
Pin 5: 2 ingredient pizza crust - with 3 ingredients
Time: 5 minutes prep - 20 minutes bake
Cost: around $1.25
Result: Delicious!

Originally pinned from: http://www.kidspot.com.au/best-recipes/Dinner+7/2-ingredient-pizza-dough-recipe+2760.htm
Definitely the tastiest easy crust I've ever made. Also the easiest. I did add a third ingredient because the first time I made it, it was pretty bland. A teaspoon of Pampered Chef Rosemary Herb mix made all the difference.
I topped mine with Tomato and Basil spaghetti sauce and shredded mexican blend cheese. Short and Sweet.


Thursday, August 2, 2012
Pin 4: Tissue-box Upcycled into Grocery Bag Holder
Time: 20 minutes
Cost: $0
Result:Poor Fair

Saw this pin and got excited for 2 reasons. 1.) A free way to corral all the plastic bags floating around under my kitchen sink. 2.) A quick-and-easy project! all you have to do is pushpin an empty tissue box to the inside of a cabinet door.
I seriously thought I'd be done with this in seconds. I was so sure, that I even counted the seconds so I could properly relay it here. HahahaHAHA..HA!
It took me about 5 minutes of looking all over the house to find my push-pins. Then the stupid pin wouldn't go into the door so I had to go get the hammer. Then I'm sitting there on the floor with the cabinet door held between my knees so it wouldn't bounce around while hammering and all contorted around so I could hammer and hold the pin, and I smashed my finger. Grrr. So I go find a comb to use to hold the pin up..nope! Not having it. So I risked my fingers again and woke the whole house up trying to hammer the dag-on pushpin into the cabinet door. Finally got it in and realized how dumb the whole project actually looked. Argh!
Edit: In the light of day, and having used the contraption, it is actually pretty convenient. No bending over or digging around to put bags away or to find one. It does look pretty dumb, but that's why it's on the INSIDE of a cabinet door, and it was free after all. Still cranky that it took me 20 minutes to complete something so simple, but at least it's done, and the area under my sink looks less cluttered.
Cost: $0
Result:

Saw this pin and got excited for 2 reasons. 1.) A free way to corral all the plastic bags floating around under my kitchen sink. 2.) A quick-and-easy project! all you have to do is pushpin an empty tissue box to the inside of a cabinet door.
I seriously thought I'd be done with this in seconds. I was so sure, that I even counted the seconds so I could properly relay it here. HahahaHAHA..HA!
It took me about 5 minutes of looking all over the house to find my push-pins. Then the stupid pin wouldn't go into the door so I had to go get the hammer. Then I'm sitting there on the floor with the cabinet door held between my knees so it wouldn't bounce around while hammering and all contorted around so I could hammer and hold the pin, and I smashed my finger. Grrr. So I go find a comb to use to hold the pin up..nope! Not having it. So I risked my fingers again and woke the whole house up trying to hammer the dag-on pushpin into the cabinet door. Finally got it in and realized how dumb the whole project actually looked. Argh!
Edit: In the light of day, and having used the contraption, it is actually pretty convenient. No bending over or digging around to put bags away or to find one. It does look pretty dumb, but that's why it's on the INSIDE of a cabinet door, and it was free after all. Still cranky that it took me 20 minutes to complete something so simple, but at least it's done, and the area under my sink looks less cluttered.
Wednesday, August 1, 2012
Pin 3: Low-carb Peanut Butter Mousse
Time: 30 minutes and a crazy amount of dishes
Cost: $0 because we already had the ingredients
Results: Good
Yield: 4 large servings

If you've ever done a low-carb diet before, you know how difficult it is to find a yummy dessert. If not, just imagine most of the desserts you eat...by the time you take away any sugar or flour, there's not much left! When I first saw this pin, WH wasn't currently low-carb, but as it's his diet of choice, I knew I should pin it for later. Well 3 weeks into lc, without a single cheat, it was time for a treat!
http://www.ohthatstasty.com/2012/01/peanut-butter-pie-decadent-and-low-carb.html
I withheld some of the whipped cream from the recipe and chopped up 8 semi-sweet chocolate chips for garnish (adding only 2.5 carbs). For sweetener I used 1/3 tsp of liquid Stevia. Tasting it myself, it wasn't sweet at all, but it was light and fluffy and creamy and peanut buttery. I don't think I would eat it as a dessert personally, but when you've gone 3 weeks without sugar, well. Let's just say after eating one serving, WH thought about it all night long at work. I just hope it isn't a 'gateway' dessert! I'm so proud of him and his progress!
Tuesday, July 31, 2012
Pin 2: Ice-Trapped Toys
Time: 1 minute to throw together - overnight to freeze
Cost: $0
Results: Fair

First pinned from: crumbbums.com
I've seen many variations of the ice block excavation activity on Pinterest. I knew I wanted to do a kids' activity today and this is the first one that popped into my mind. Quick and easy to throw together, I looked forward to the 30 minutes to an hour of quiet out-door playtime it would buy me. I'm such a selfless parent!
1st mistake: I only froze the block for a few hours...definitely freeze it overnight. It was still liquid in the middle, which made it very easy to break
2nd mistake: I didn't really talk about it with the kids before-hand or prep any 'digging tools'. As a result, the kids just started wailing on it...which was still fun. But when the last toy was stuck 'hopelessly' in the ice, Specs had a huge melt-down with lots of 'help mommy' and 'fix a zebra mommy' with me trying to explain solutions over his screaming.
Still, it was a fun 5 or 6 minutes, completely free, and something to cool off on a hot day, so certainly not a total fail. I think I'll try it again keeping today's mistakes in mind.


Monday, July 30, 2012
Pin 1: Home-made oven cleaner
Time: 12 hours - but only 1 hour of physical effort
Cost: $0
Results: Good
What better way to start my daily projects than with a freebie that tackles a chore I've been putting off far too long.

Before: (I can't even believe I'm showing you this. It looks like it belongs in a crack den...although...do crack-heads cook? I bet their oven is even cleaner than mine!)
 |
| How does it even get this gross?! |
During: As seen on the OneGoodThing blog:
I first pre-heated the oven to 200 while boiling a large pan of water (for the record, I can't highly recommend you follow in my steps and decide to do all this on one of the hottest days of summer)
Then I selected a large bowl and filled it about half-way with ammonia. Phew...I almost passed OUT!
Turn the oven off just before placing the bowl of ammonia on the top rack and the pan of boiling water on the bottom rack. Shut the oven door and let it sit overnight. The rest of the evening the whole house had the faint, nose-hair tingling aroma of ammonia.
This morning, I opened the oven and gave it a quick wipe-down. It definitely made a HUGE difference, but some elbow grease was still needed
After first Wipe-down:

After brillo pad:
Once I pulled out the big-guns, the door required virtually NO scrubbing, and the inside only light scrubbing. It's not perfect (obviously) but I'm pretty thrilled with the results.

Subscribe to:
Comments (Atom)